Custom Resolution Utility (CRU) has become a go-to tool for PC users who want deeper control over their monitor’s display settings. From adding new resolutions to unlocking hidden refresh rates, CRU offers a level of flexibility unmatched by native display settings in Windows. But one question often arises: Is it compatible with your specific monitor?
To answer that, you need a good understanding of how CRU works, the types of displays it supports, and how different hardware and software configurations impact compatibility. This guide breaks it all down in clear, detailed language so you can confidently use CRU—or know when it won’t work.
Understanding How CRU Works
CRU doesn’t magically create new resolutions or override your graphics card’s capabilities. Instead, it edits the Extended Display Identification Data (EDID) that your monitor provides to your graphics driver. This EDID tells the system what resolutions and refresh rates the display supports.
CRU enables you to:
- Add custom resolutions not exposed by default.
- Remove undesired modes.
- Change refresh rates within the monitor’s capabilities.
- Tweak detailed timing parameters.
Importantly, CRU only affects EDID data stored or overridden in the graphics driver—not the monitor’s firmware.
Hardware Requirements and Limitations
Compatibility with CRU depends less on your monitor and more on your GPU and display driver. Here’s what you need to know:
Graphics Card Compatibility
CRU works best with the following:
- AMD Radeon GPUs (excellent support)
- NVIDIA GeForce GPUs (good support with some limitations)
- Intel integrated GPUs (mixed results depending on drivers)
Some integrated graphics solutions or outdated drivers may ignore custom EDID overrides, reducing CRU’s effectiveness.
Monitor Type
CRU supports monitors that use digital interfaces like HDMI, DVI, and DisplayPort. VGA monitors or older analog displays generally aren’t supported because EDID override doesn’t apply the same way.
EDID Override Support
Your system must allow EDID overrides. Most modern Windows systems do, but this can be blocked in some laptops or embedded systems.
Driver Behavior
Certain Windows updates or GPU driver versions may reset or ignore EDID overrides, especially on Intel-based systems. Always ensure you’re using a GPU driver version known to work with CRU.
Types of Monitors and CRU Compatibility
Let’s explore how different categories of monitors handle CRU configurations:
Standard LCD Monitors
Most standard desktop LCD monitors using HDMI, DVI, or DisplayPort connections work well with CRU. You can add custom resolutions, enable higher refresh rates, or even fix scaling issues.
High Refresh Rate Monitors
CRU can be very effective with gaming monitors supporting 120Hz, 144Hz, or 240Hz. You can fine-tune refresh rates and timings to avoid screen tearing or match GPU output for smoother gameplay.
However, pushing beyond the monitor’s rated limits can cause flickering, blank screens, or damage in rare cases. Always test carefully.
Ultrawide Monitors
CRU can help if your ultrawide monitor isn’t showing its full native resolution or you’re trying to scale games properly. Be sure to use detailed timing to match the monitor’s specifications.
Laptops and Built-In Displays
Laptop displays are hit-or-miss. Some integrated displays don’t respect EDID overrides, especially on Intel GPUs. Even when CRU appears to work, Windows or the manufacturer’s power management software may interfere.
CRU can sometimes work if the internal display uses DisplayPort internally (eDP), but don’t rely on it.
TVs and Non-PC Displays
TVs connected via HDMI may support CRU changes, but results are mixed. Many TVs are strict about accepted resolutions and refresh rates, especially when dealing with non-standard timings.
Expect some trial and error here. Some TVs will display a “mode not supported” message if the custom resolution is slightly off.
Signs Your Monitor Supports CRU
Check for these signs to determine if CRU is likely to work:
- You see active, detailed resolution listings in CRU after launching it.
- Your monitor allows resolution changes in Windows beyond the default list.
- Your graphics driver lets you override EDID data (common with AMD).
If you try CRU and nothing changes after a reboot, your system or monitor may not support overrides, or you may need to tweak settings further.
Setting Up CRU Step-by-Step
If you’ve determined your system supports CRU, here’s how to use it properly:
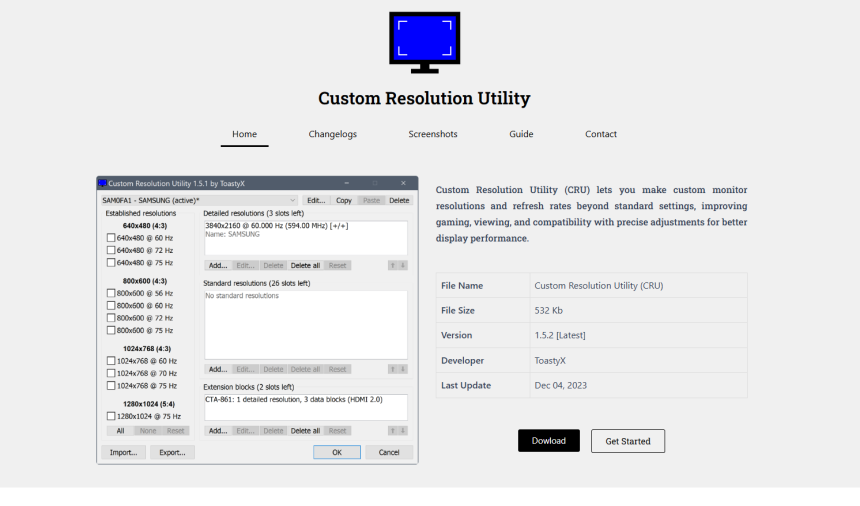
Download and Launch CRU
- Visit the official CRU page and download the latest version.
- Extract the files and launch CRU.exe.
Identify the Monitor
- Select your connected monitor from the dropdown menu.
- If you don’t see your monitor listed, CRU may not be compatible.
Add or Modify a Resolution
- Under “Detailed resolutions,” click “Add” and enter a new resolution.
- Use the “Timing” dropdown to select Automatic, CVT-RB, or Manual depending on what works best.
Save and Reboot
- Click OK and run restart.exe or reboot your PC manually to apply changes.
- After rebooting, open display settings or your GPU control panel to test the new resolution.
Troubleshooting Compatibility Issues
If CRU doesn’t seem to work with your monitor, try the following:
Check Connection Type
Make sure you’re using a digital connection. VGA inputs often prevent proper EDID overrides.
Test Basic Changes
Try adding a minor variation of an existing resolution (e.g., 1920×1079 at 59Hz). If this works, your system likely supports CRU, but complex changes may need fine-tuning.
Update Drivers
Outdated or buggy GPU drivers may block CRU’s effectiveness. Try updating or rolling back to a more stable version.
Reset Monitor Settings
Some monitors cache EDID data. Try resetting the monitor to factory settings if custom resolutions aren’t showing up.
Use Monitor-Specific Tools
Certain manufacturers provide utilities that lock or override EDID data. Disable those if possible.
Use Cases Where CRU Shines
CRU isn’t just a tech toy—it solves real-world problems:
- Enabling 75Hz on 60Hz Monitors – Some displays support hidden refresh rates that CRU can activate.
- Creating Custom Resolutions for Emulation or Legacy Games – Perfect for pixel-perfect displays.
- Fixing Black Borders or Underscan Issues on TVs – Add custom timings to correct screen scaling.
- Unlocking Full Potential of High-End Panels – Modify resolutions to match panel native capabilities.
When CRU Might Not Be the Right Tool
Despite its power, CRU isn’t a cure-all. Consider alternative solutions if:
- You use a laptop display that ignores EDID changes.
- Your GPU blocks overrides due to driver limitations.
- You need dynamic resolution switching, which CRU doesn’t support.
In such cases, software like NVIDIA Control Panel or AMD Radeon Settings may offer limited but reliable options.
Safety Considerations
While CRU doesn’t physically harm monitors, pushing too far outside the panel’s spec can lead to:
- Blank or flickering screens
- Temporary lock-ups
- Incorrect aspect ratios
Always document your original settings before making changes. Use reset-all.exe provided with CRU to revert if things go wrong.
Conclusion
Custom Resolution Utility offers a powerful way to tailor your display experience, but compatibility isn’t universal. If you’re using a modern monitor with AMD or NVIDIA graphics and a digital connection, chances are good CRU will work for you. However, users with integrated Intel graphics, laptops, or HDMI-connected TVs might experience inconsistent results.